My miter saw station in the basement shop flat out makes me happy. I do quite a bit of wood work and my prior setup was fine for when I was just starting out but it wasn’t really cutting it for more than the occasional casual DIY project.
But by this point I was building and finishing full furniture pieces on a regular basis. I was ready for a real commitment, to look into a miter saw station plan’s eyes and say those special words: I want to build something permanent that takes up half my shop.

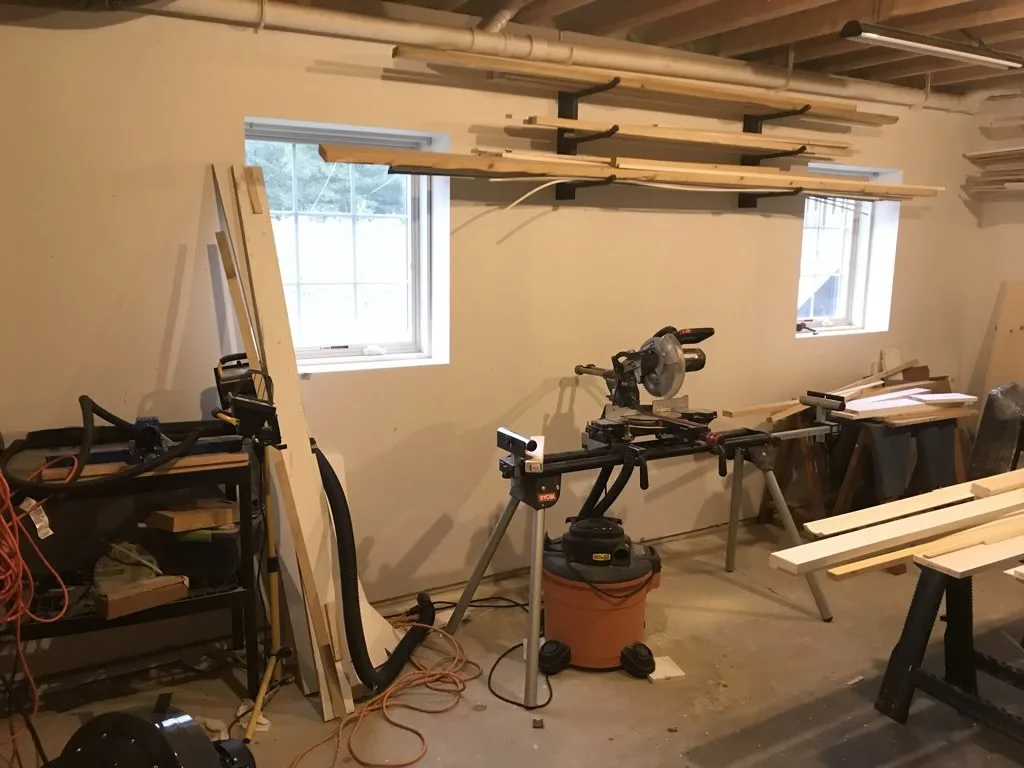
So this messy shot is where I was starting from. I have a great space in my basement but it was cluttered and full of cheap plastic shelves and even cheaper saw horses or folding tables to work on.
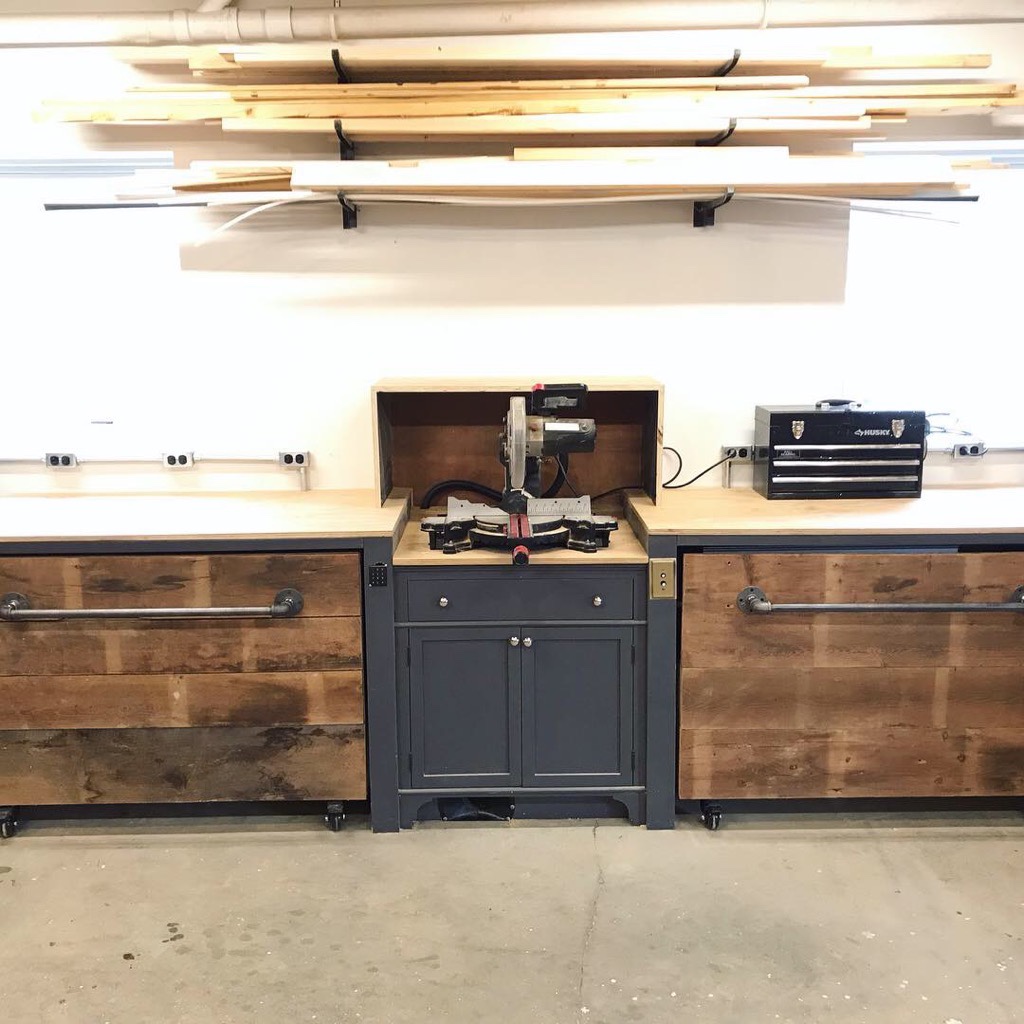

But here is where we ended up.
The Plan
Some of my original inspiration came from Ana White’s roll away workbench plan. I’m sure I sketched out a couple hundred variations of things and worked on a list of what I needed in the shop, but eventually I distilled that down into a Sketchup drawing. This one was more detailed and less of a rough feel version than my garden plan.
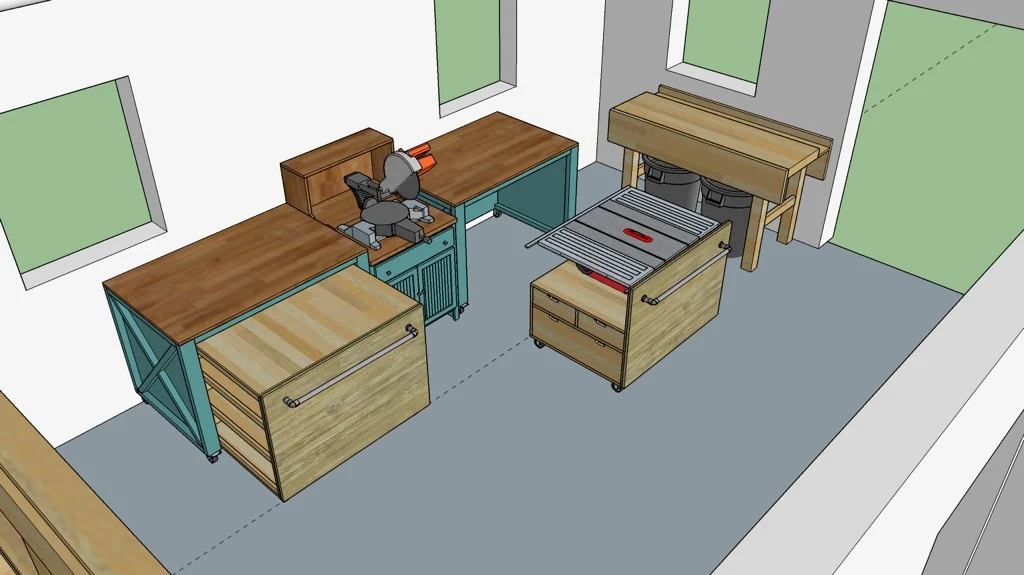
I had a list of things I needed to incorporate:
- Dust collection for the miter saw and other tools
- Counter space for working and laying material flat to cut
- A rolling assembly cart with materials for glue ups and clamp storage
- A rolling table saw cart with dust collection hookups
- Storage for table saw attachments
- Storage for tools
- A place for the crown jewel: a pretty mediocre entry level Craftsman sliding miter saw that I bought on sale during Black Friday when building the house that I always mean to replace with an upgrade but somehow still haven’t.
Dust Collection
The plan for the dust collection was centered around a Harbor Freight collector with a DIY separator (fancy pants name for some PVC pipe connectors and a garbage bin) with blast gates on either side. The complications here was how to open and close gates from a central place. I used Bob @ I Like to Make Stuff’s tutorial with some modifications and wired my blast gates to a keypad. 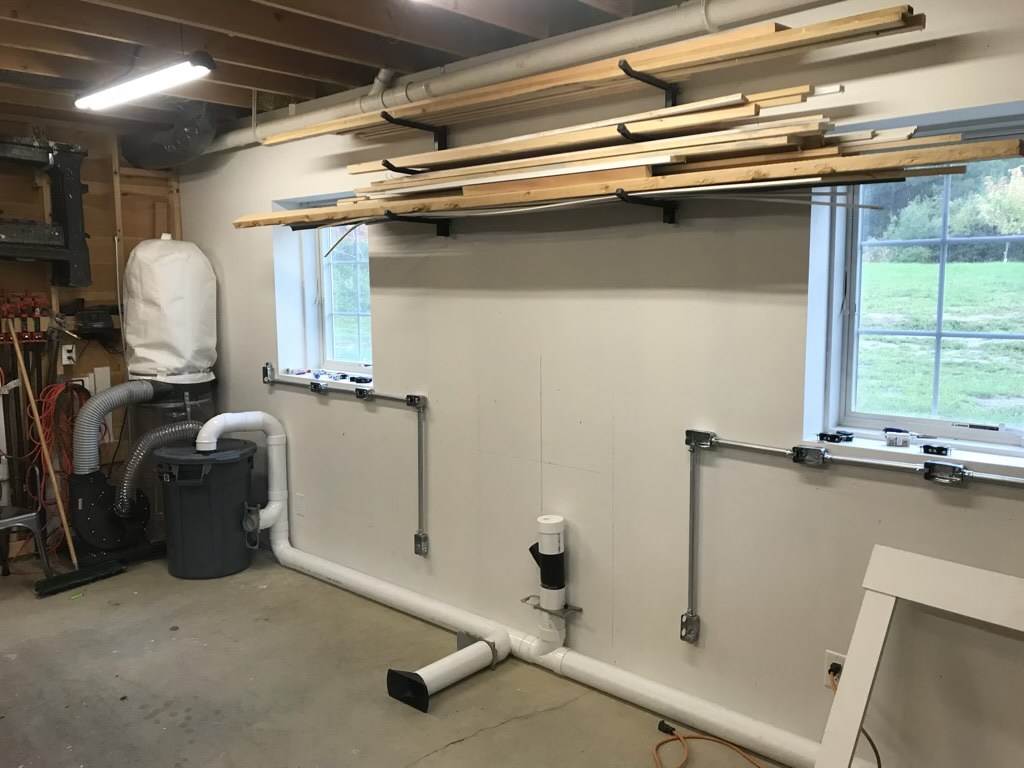

I also made a remote push button switch to remotely switch the outlet from the miter saw. Did I need to use a fancy brass backplate and push button switch? No, of course not but welcome to my projects. 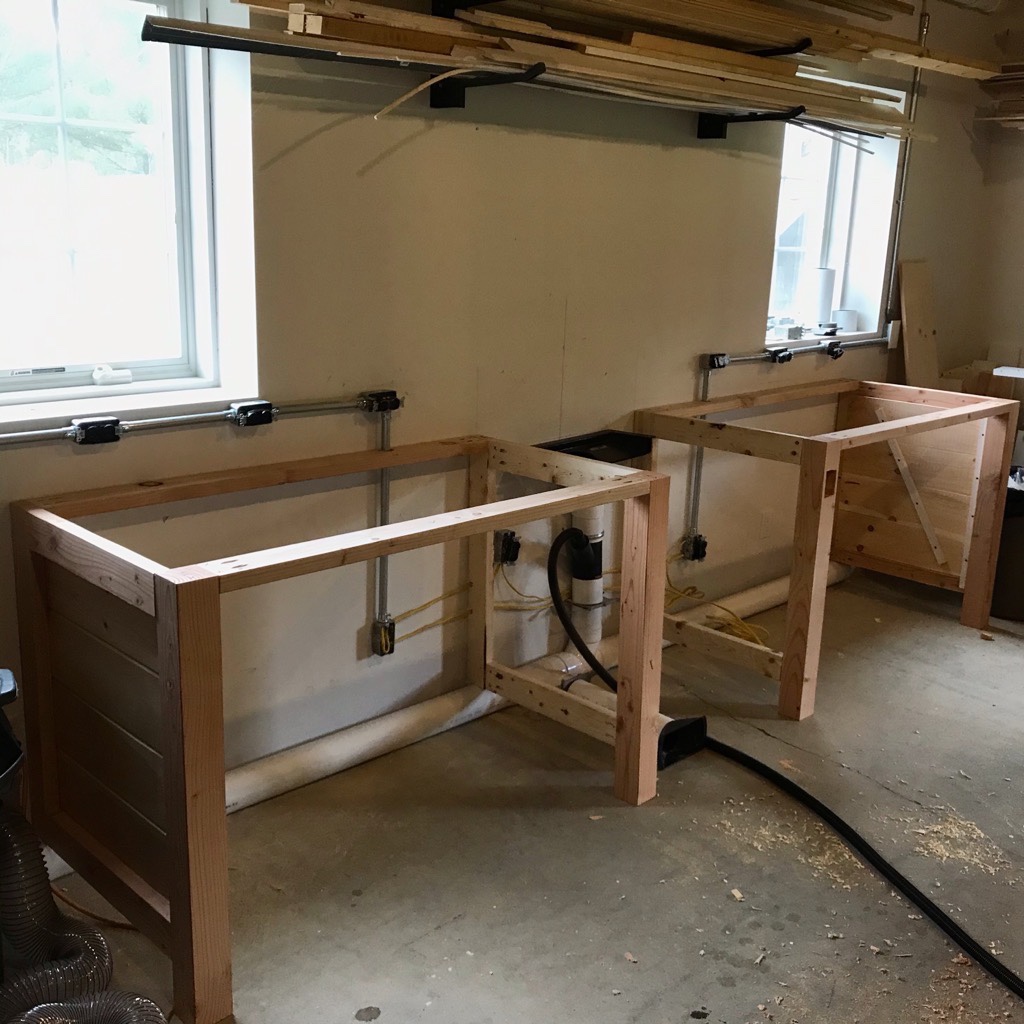

The upright pipe shown here ends in a flat tray that collects most of the dust behind the miter saw and pulls it down into the dust collection system. The horizontal pipe under it is a hidden sweep that eventually hides in the toe-kick of the cabinet under the miter saw. The pipe along the back wall doesn’t interfere with the rolling cabinets as they are built 4″ more shallow that the over arching wings.
Miter Saw Station Wings
Just having space to work was a big deal for me so I made sure to give myself 4+ feet of space on either side of the saw. I also wanted the assembly cabinet to be as big as possible so I had to make the wings a little larger than I would have otherwise. 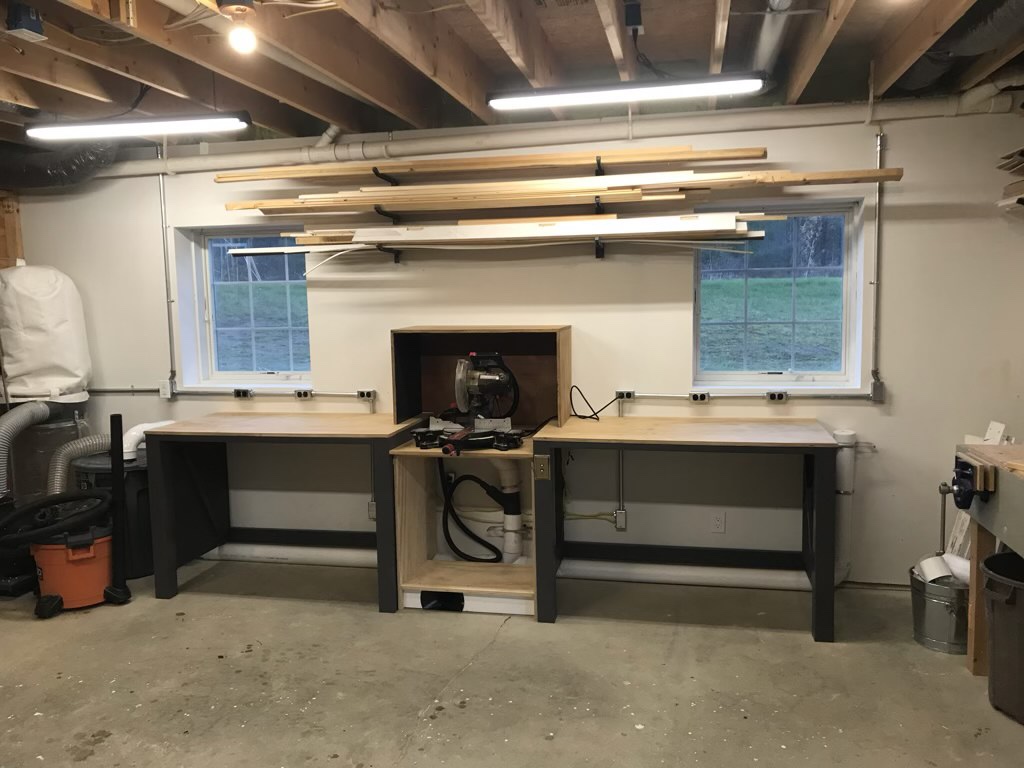

The hood here was a little higher than I needed it to be and would eventually get trimmed down a few inches after I realized I didn’t need quite that much height. The outlets along the back of the wall were also added to make sure I could run plenty of things like sanders, jigsaws, drill presses or whatever without having to unplug other tools.
Main Miter Saw Station Cabinet

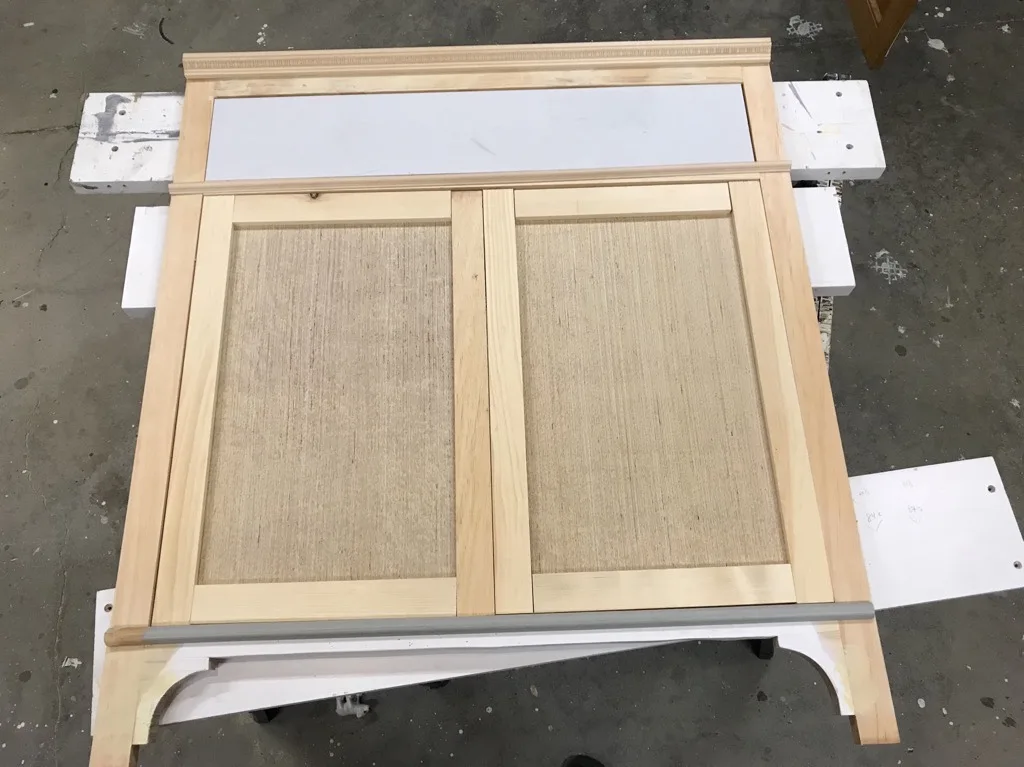
Does a miter saw station cabinet need three types of trim and a decorative arched toe-kick? If the answer is no then I’m clearly the wrong guy to ask. I know other people have at least attempted to build a miter saw station without these elements and I guess it works? I don’t know, I wouldn’t risk it. Add the trim. 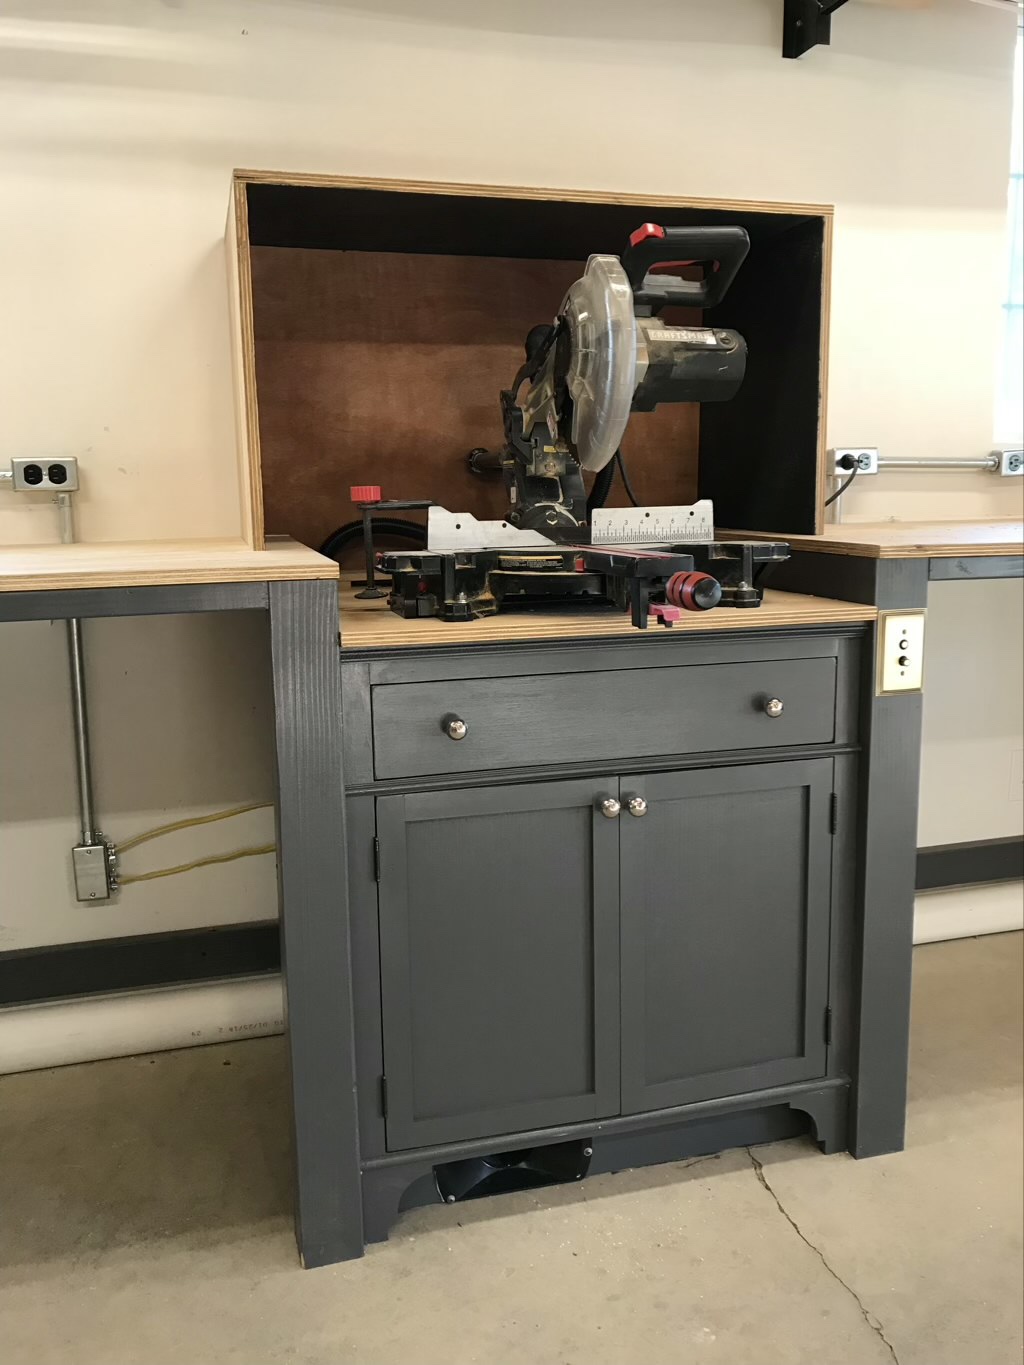

Here you get a better view of the brass plate for the dust collector power switch as well as the hidden floor sweep under the miter saw cabinet. The shiny chrome knobs were left over from another project but I’m fine with them and haven’t felt the need to replace them yet.
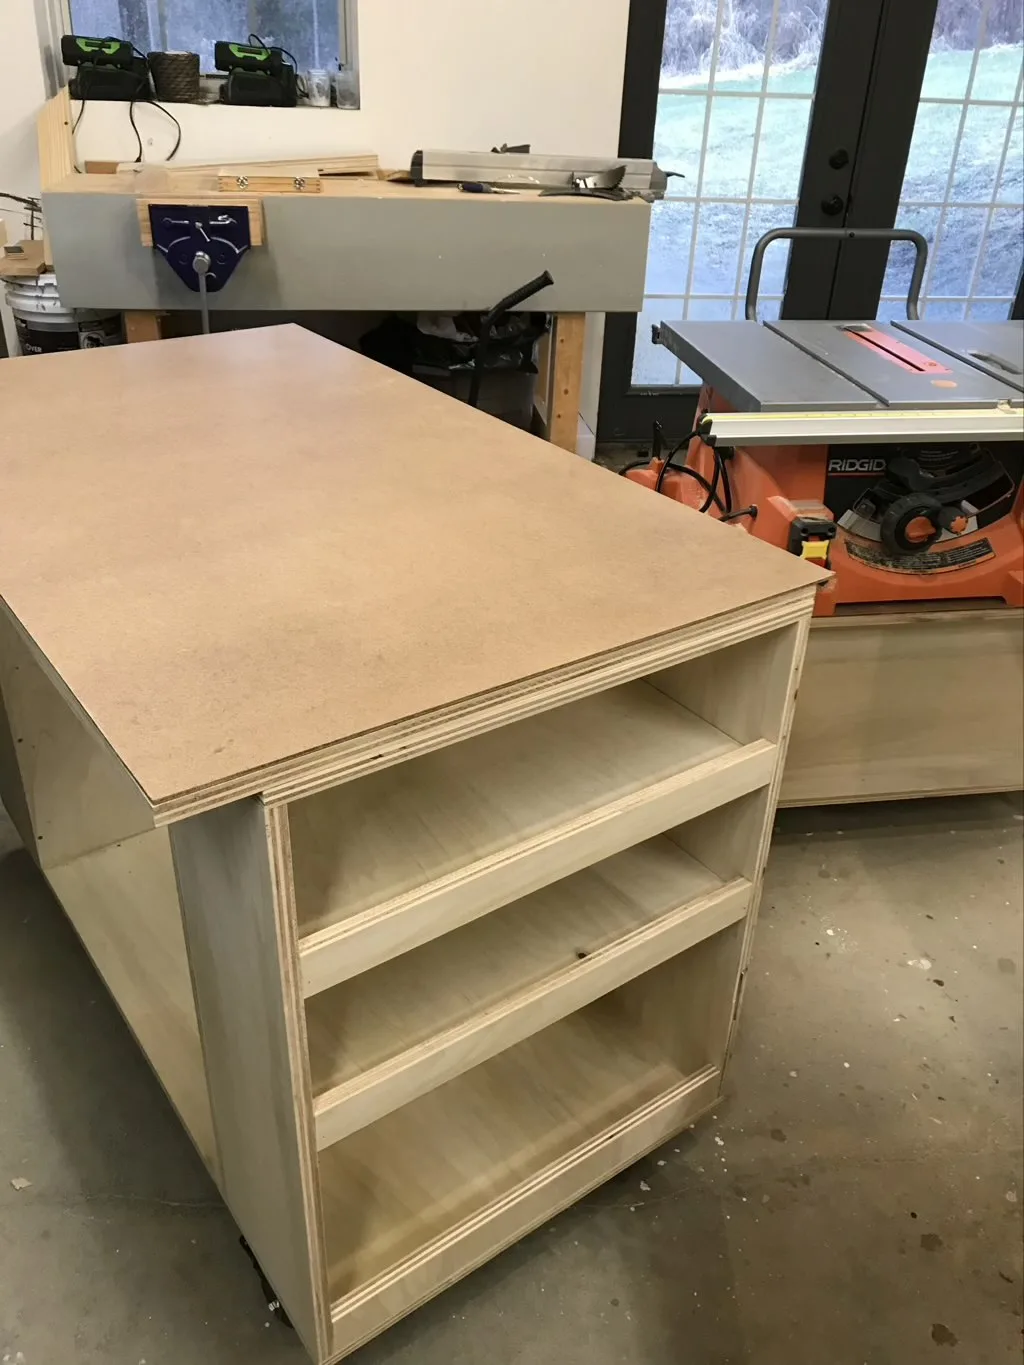
Roll out Assembly Cabinet
Some of the goals for the assembly cabinet were to have all of my sanding, glue-up and pocket hole materials in one spot. I also wanted the assembly cabinet to act as an outfeed for the rolling table saw cabinet. 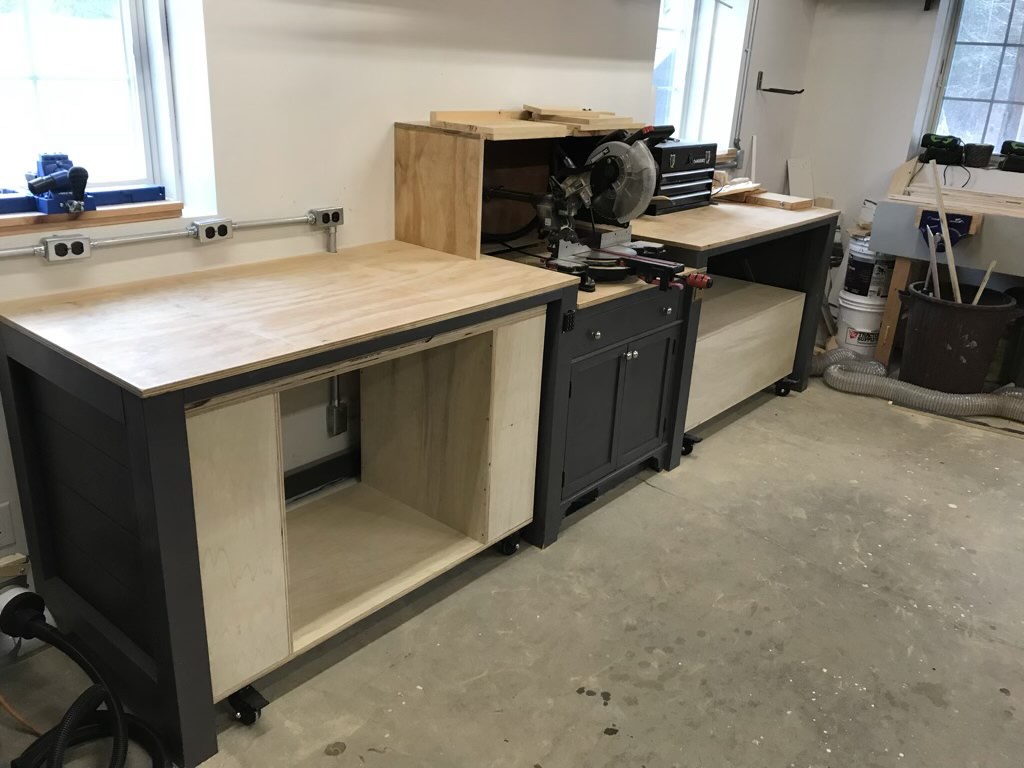

The open center section here is for a set of drawers. One side of the cabinet is for materials like glue, sanding blocks, pocket hole screws, etc. For a top I added some hard board that has a glossy finish on the top that can be replaced (and already needs to be). 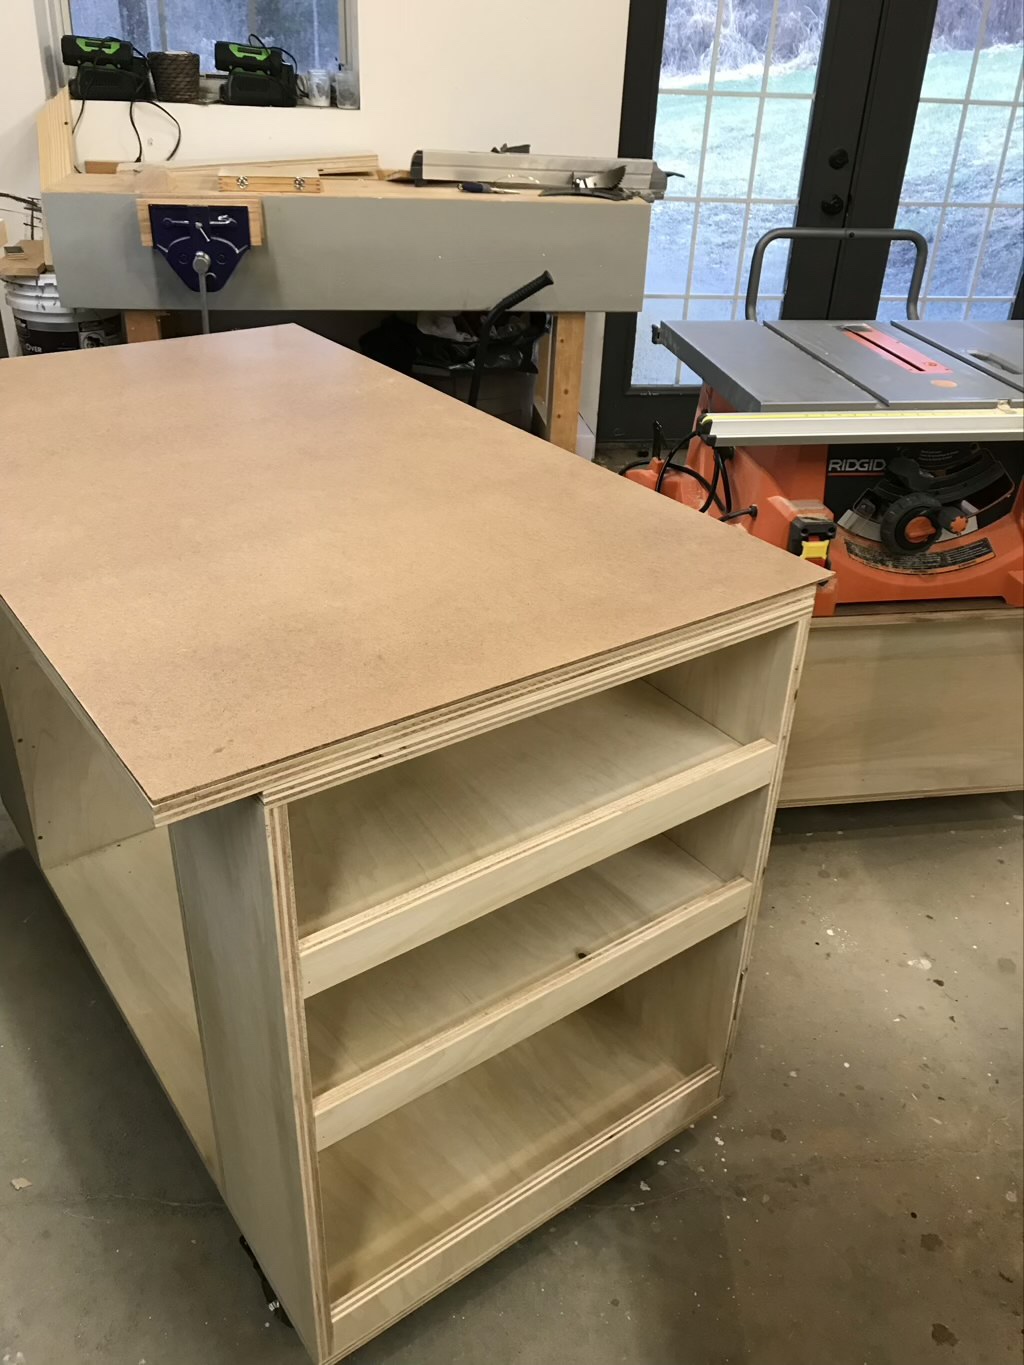
The other side of the cart holds a clamp rack, one rack that swings out and one that is fixed. Most of my clamps are from Harbor Freight because you really can’t beat the price.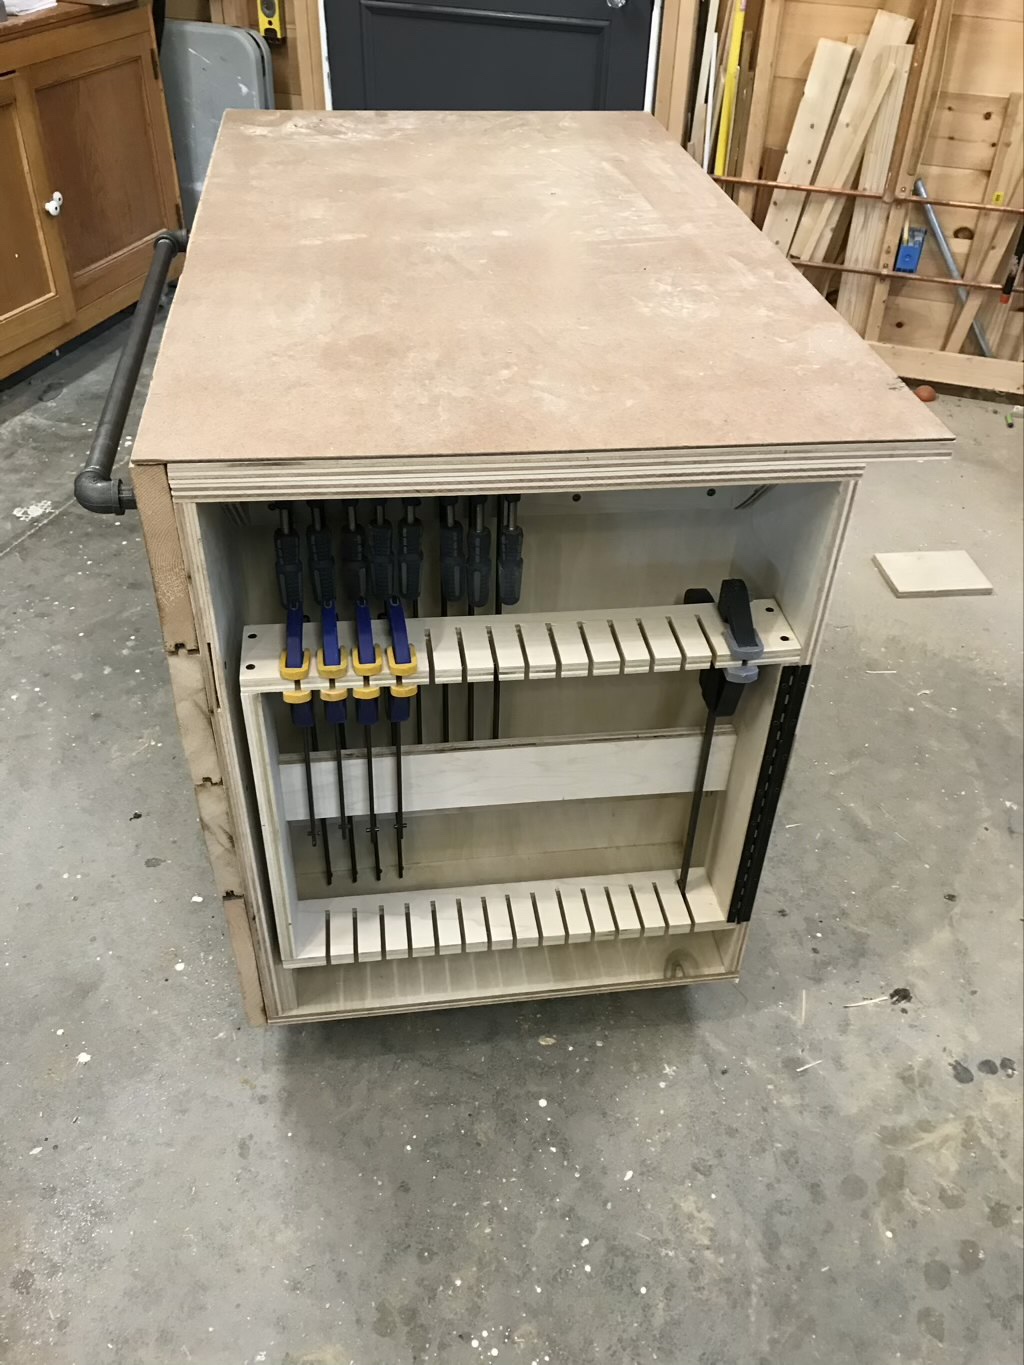

For the drawers I tried my hand at matching the grain on the drawer fronts from a single piece of plywood. Again this is being a little extra considering the drawers face the back of the cabinet at aren’t even seen most of the time, but I’m okay with that. 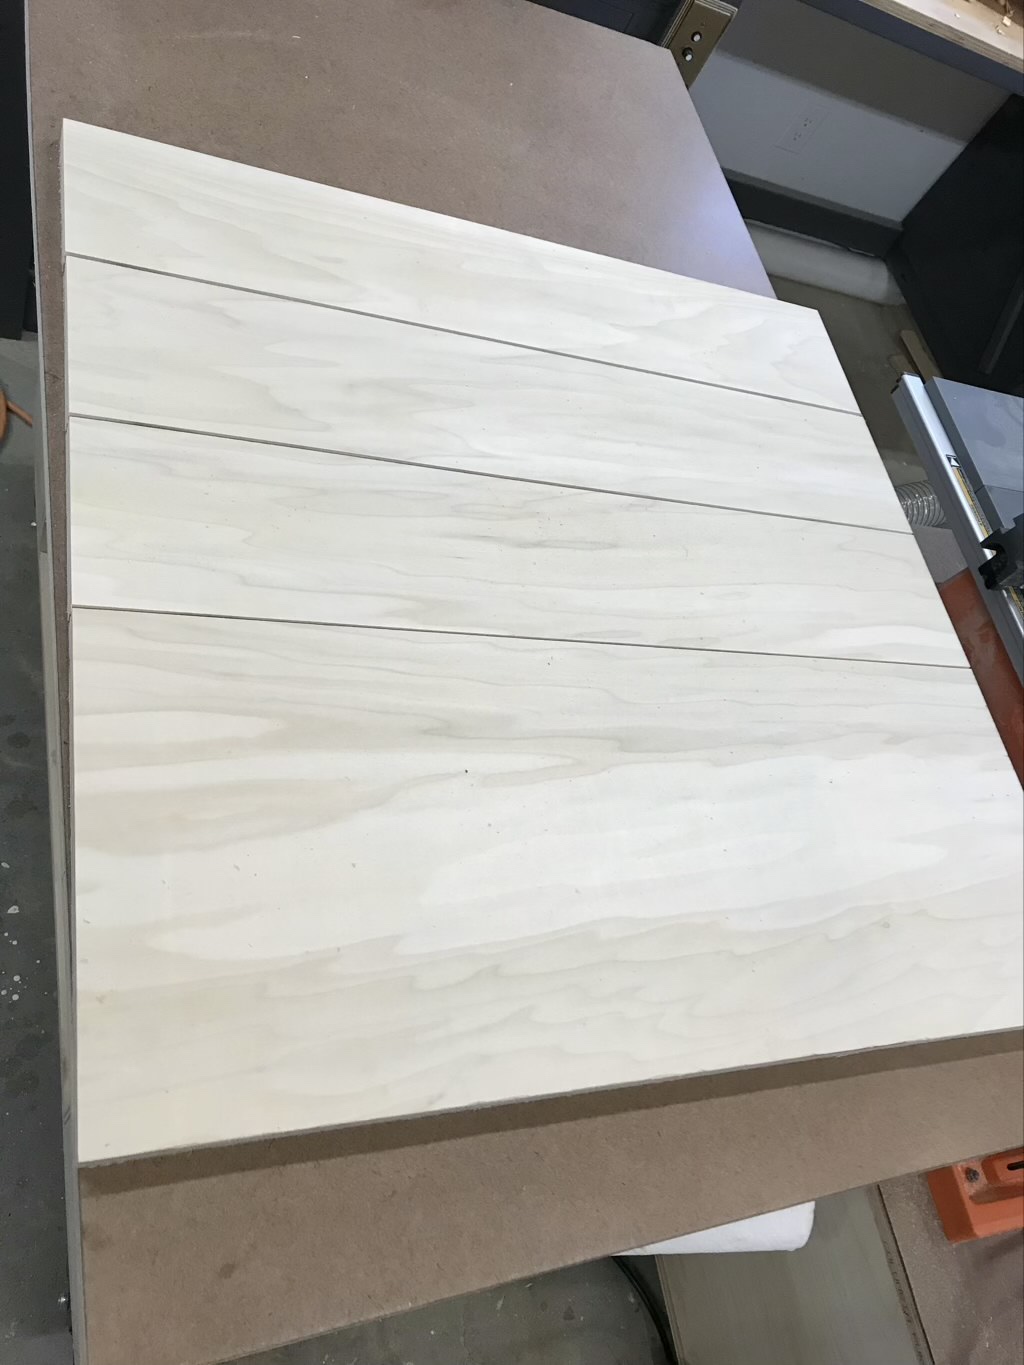
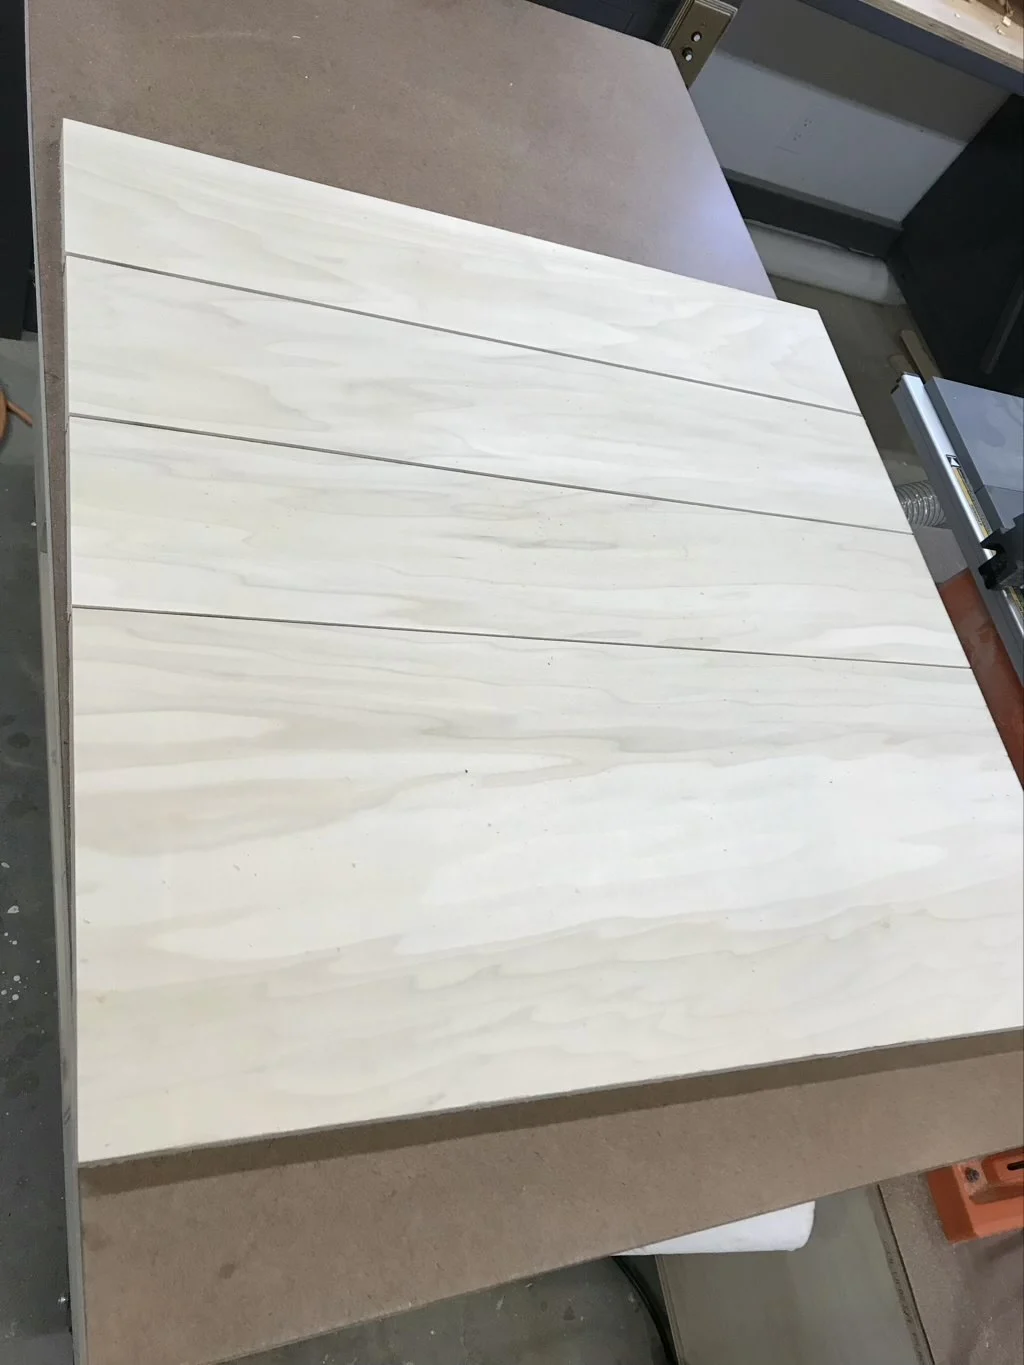
For the drawer fronts, I went with simple cutouts so that there is nothing sticking out to catch on my pants. I have ripped more than one pair of pants getting them caught on things while working on projects, which feels like a lot more pants than expected. 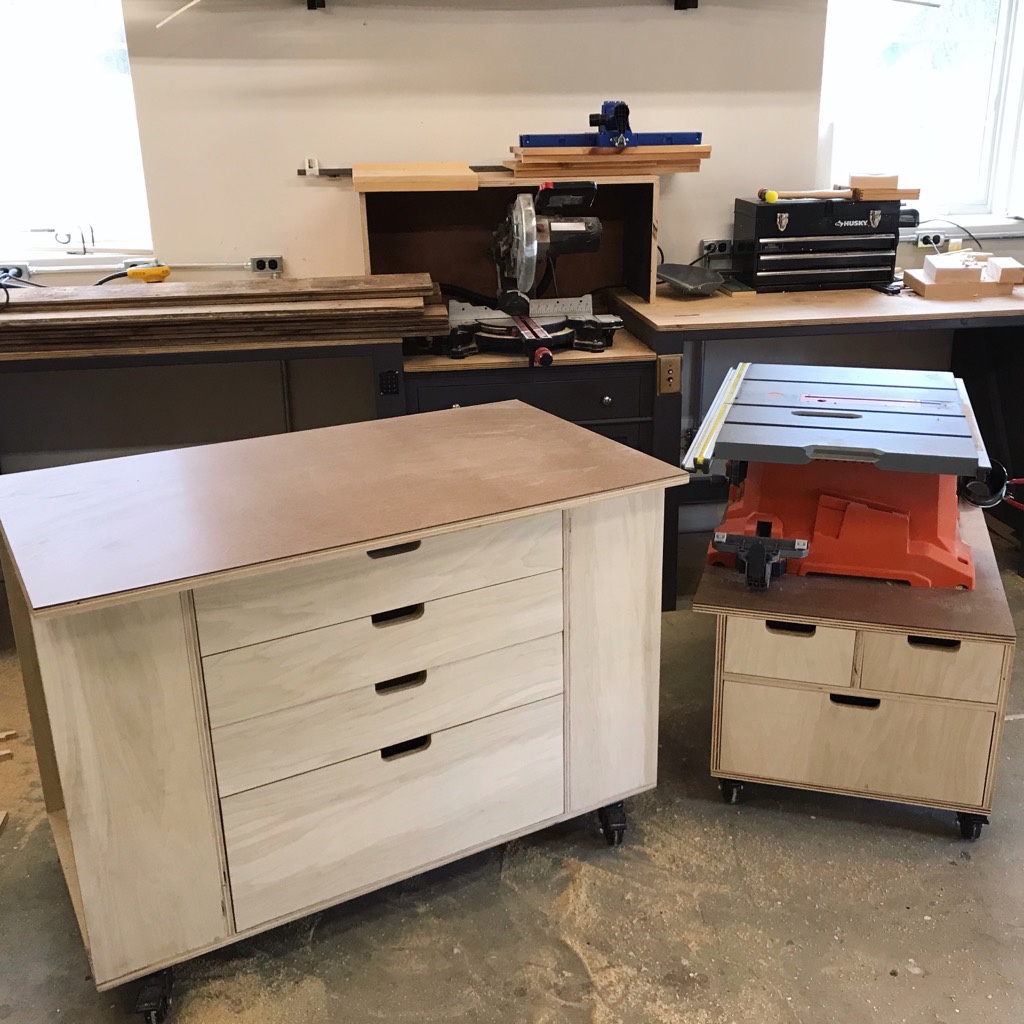
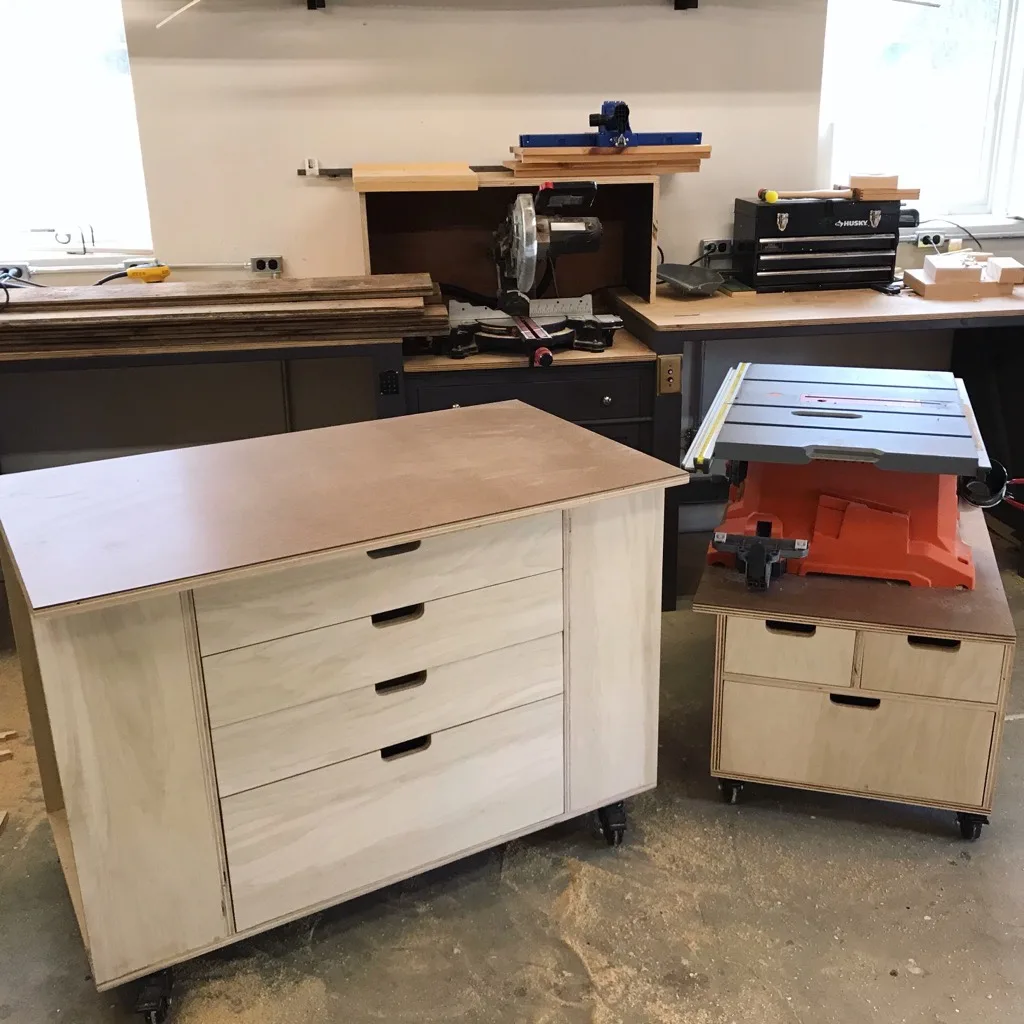
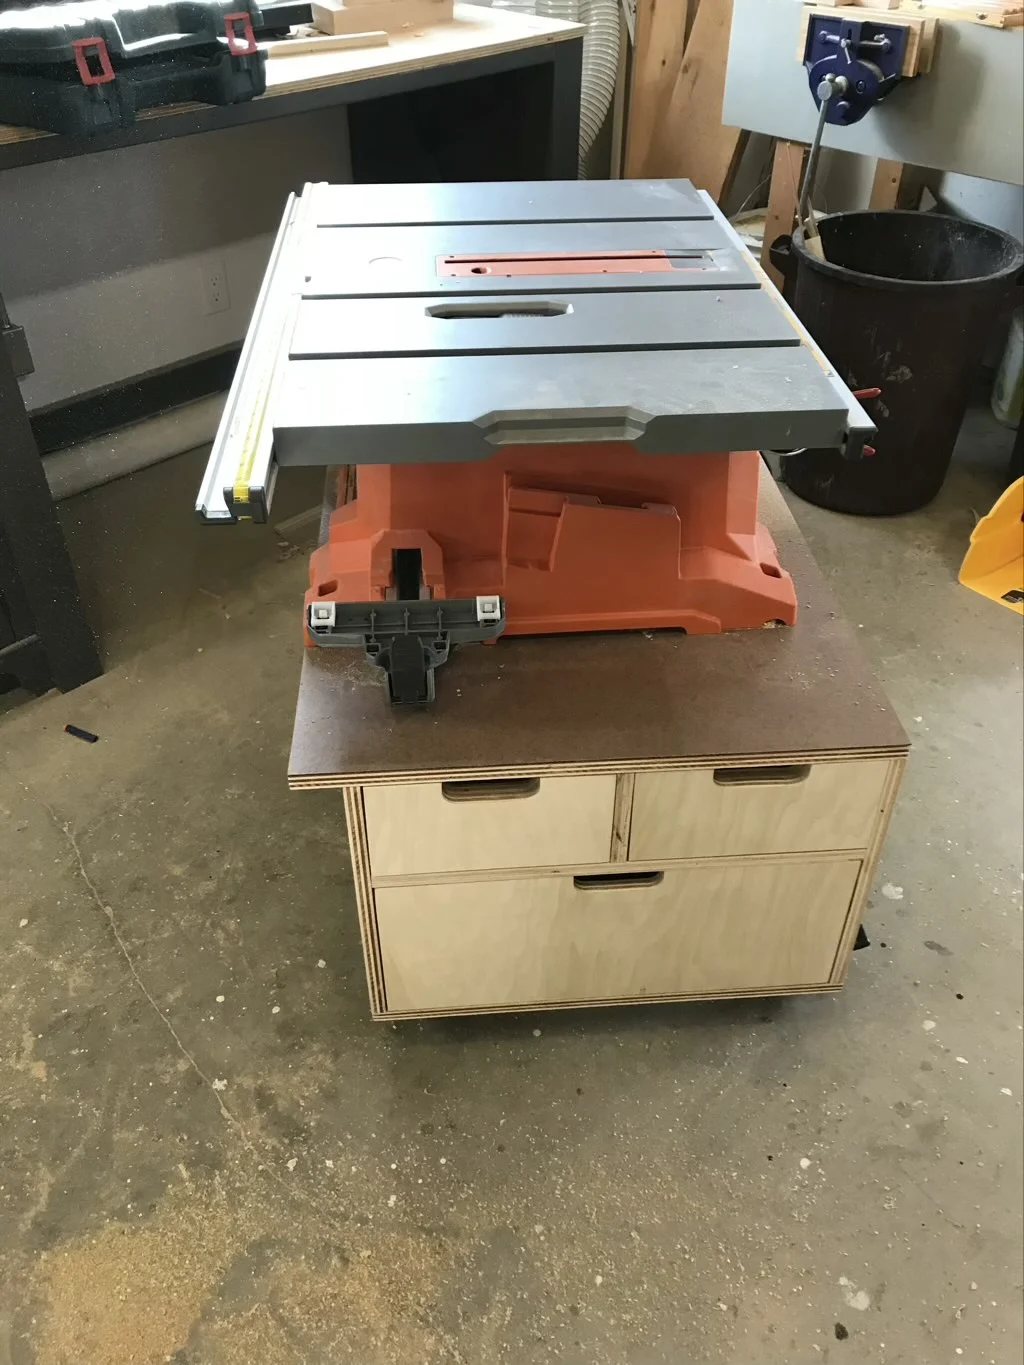
Roll out Table Saw Cabinet
My old table saw was wobbly, unreliable and had a wildly out of square fence. In short, I was better off free-handing with a circular saw than trying to make use of it. Upgrading to a Ridgid job site saw was a huge improvement but it took up space and I wanted to be able to put it away since my shop also acts as the walk-out entrance to the basement. Since I was planning to use the assembly table as an outfeed I was very constrained on the height of this cabinet and what I could fit underneath. 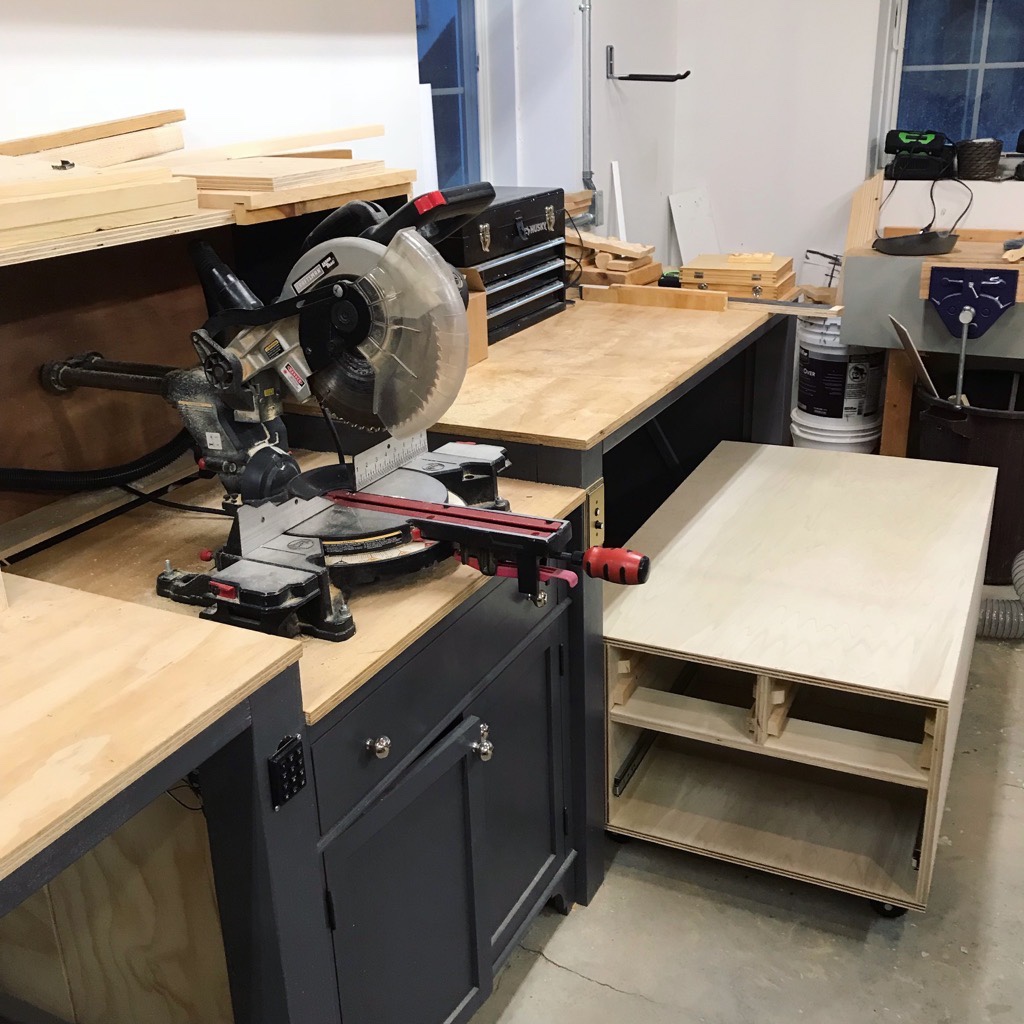

I settled on having the same two smaller drawers over one larger drawer design on either side of the cabinet. In the end I could have maybe used one large slide through drawer for a table sled. 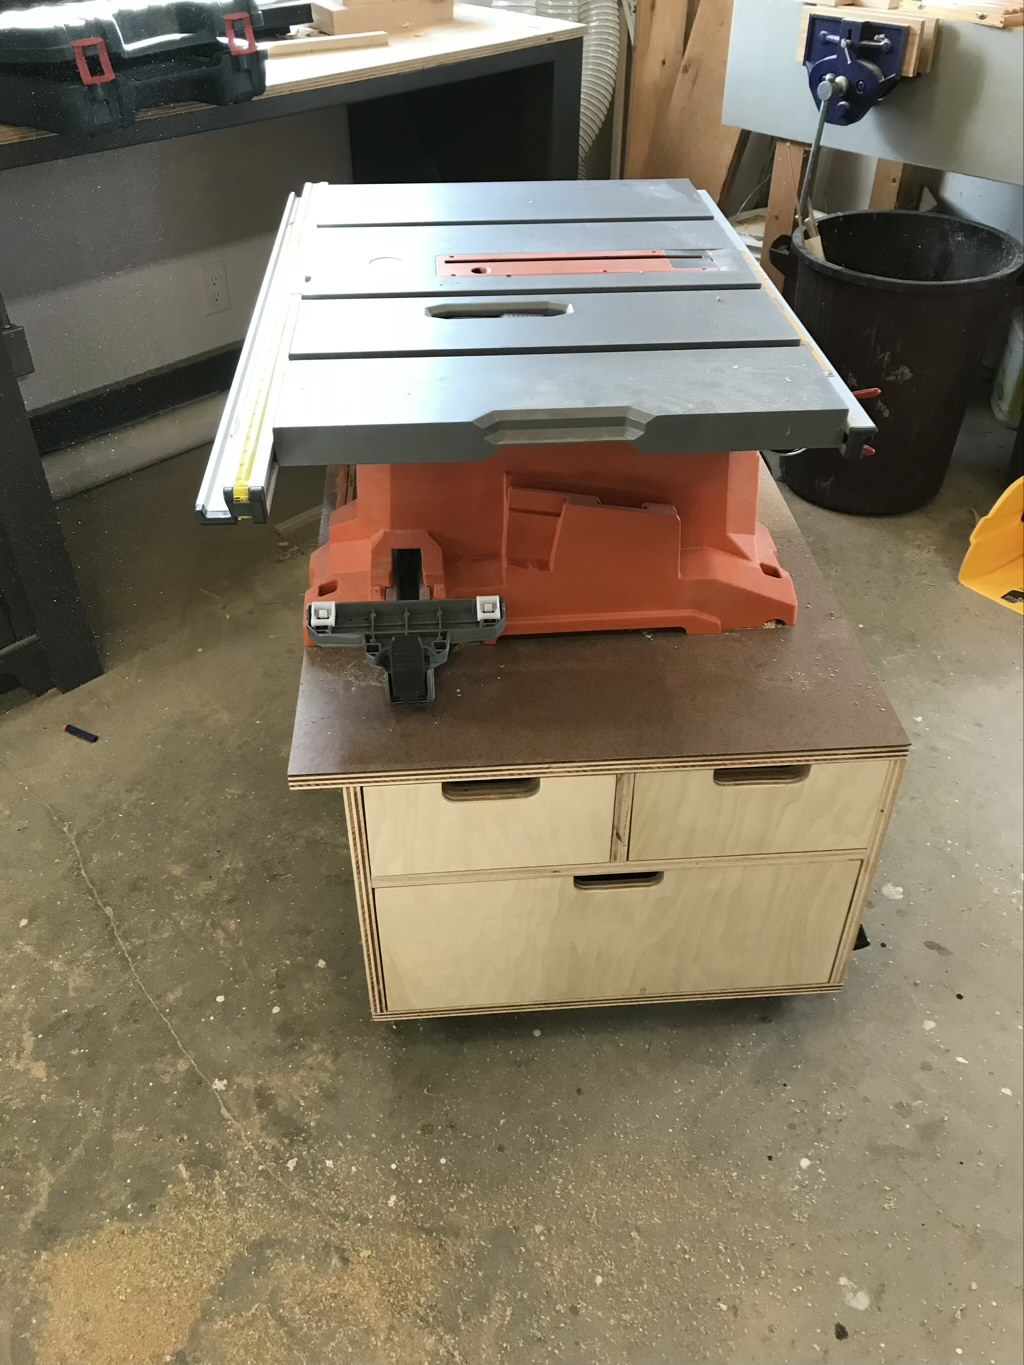
Adding Reclaimed Wood Fronts
For the face of the cabinets I had originally planned to have just flat plywood faces, similar to Ana White’s original plans. I love the contrast between raw or stained wood and painted housing. However I just happened to find some old reclaimed lumber in my dad’s barn next door and well I’m pretty darn happy with how it came out. 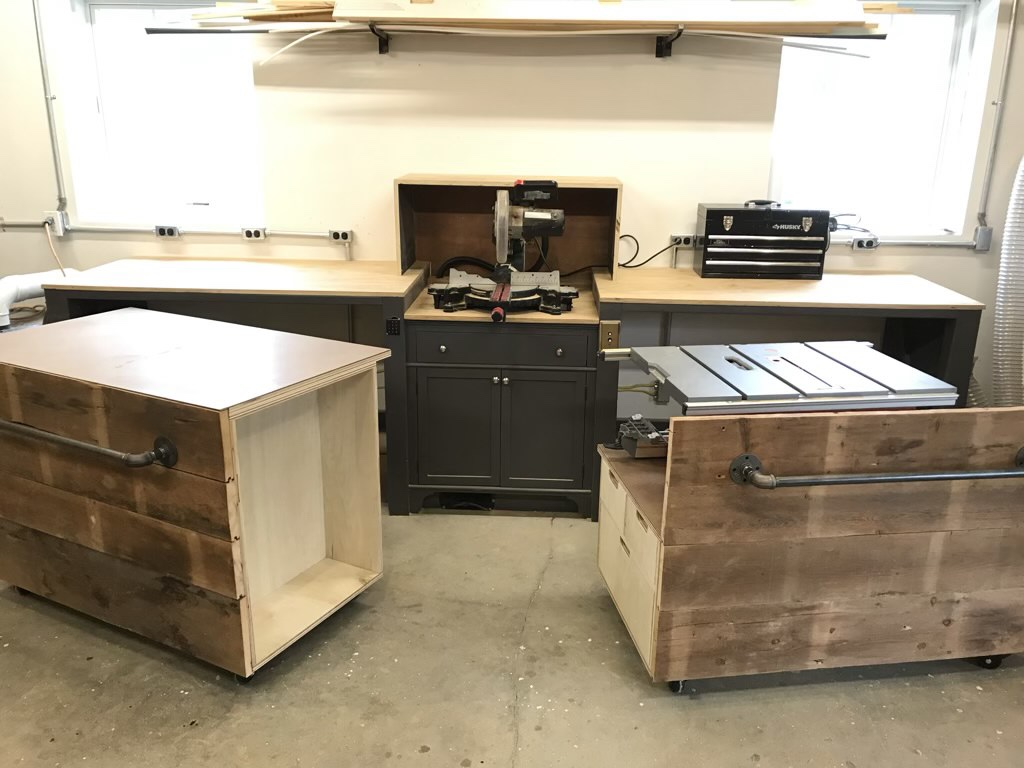

I did have to route out a groove in the table saw cabinet boards to place metal bars in to support the top portion of the face. Getting the reveal around the front of the cabinet was actually easier than I had feared. 
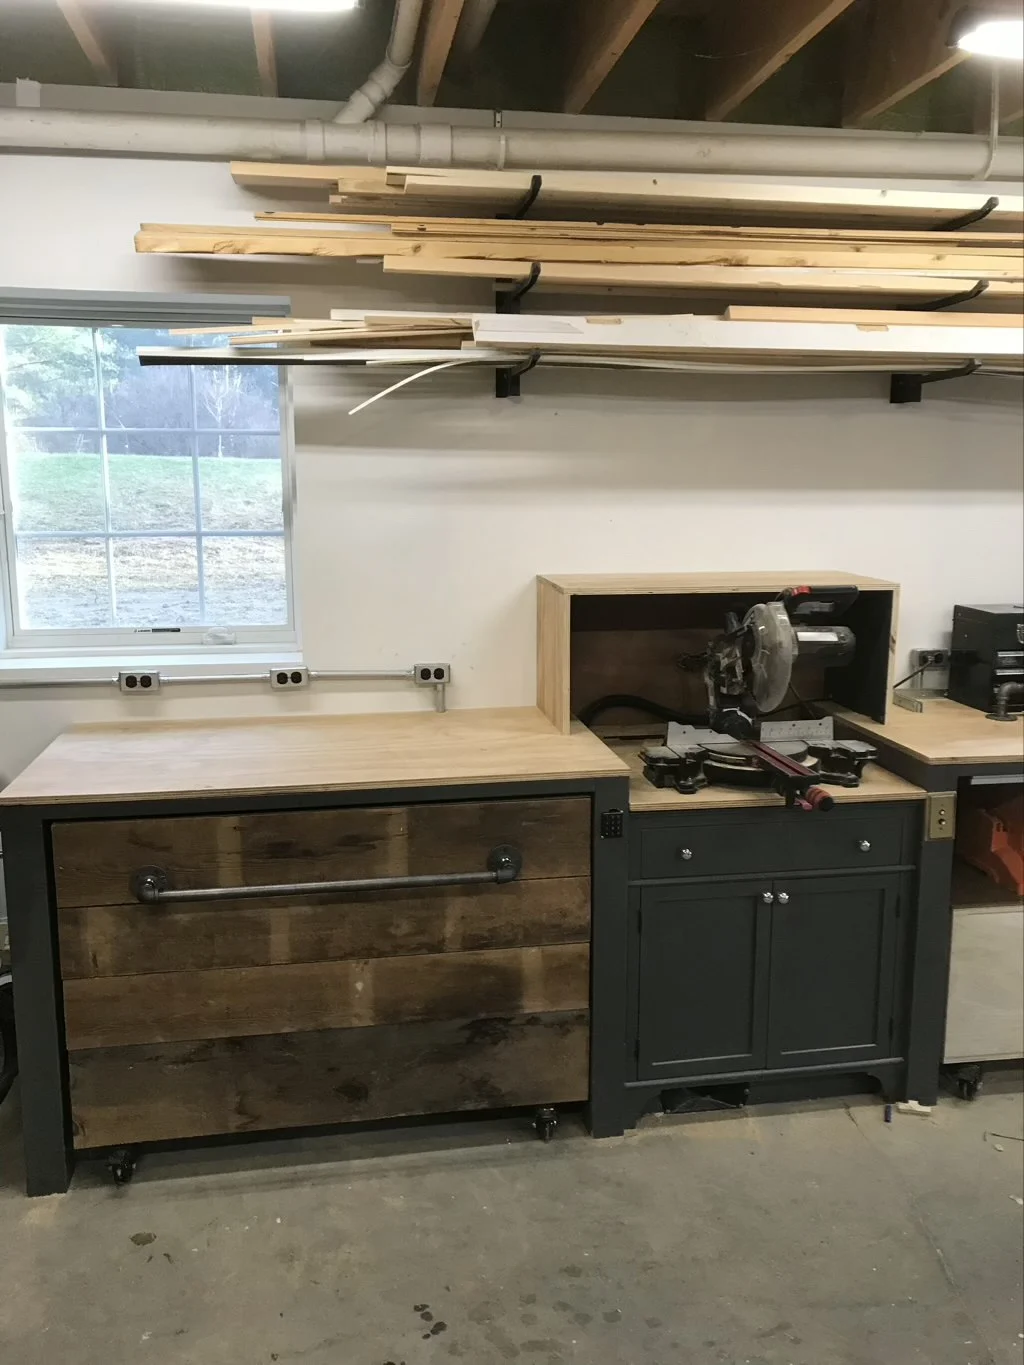
Adding the 3/4″ iron pipe handles was an easy choice because I wanted something large enough to go across most of the cabinet and sturdy enough to pull on. The fact that the aesthetic of the pipes go so well with the reclaimed barn wood is just an added bonus. 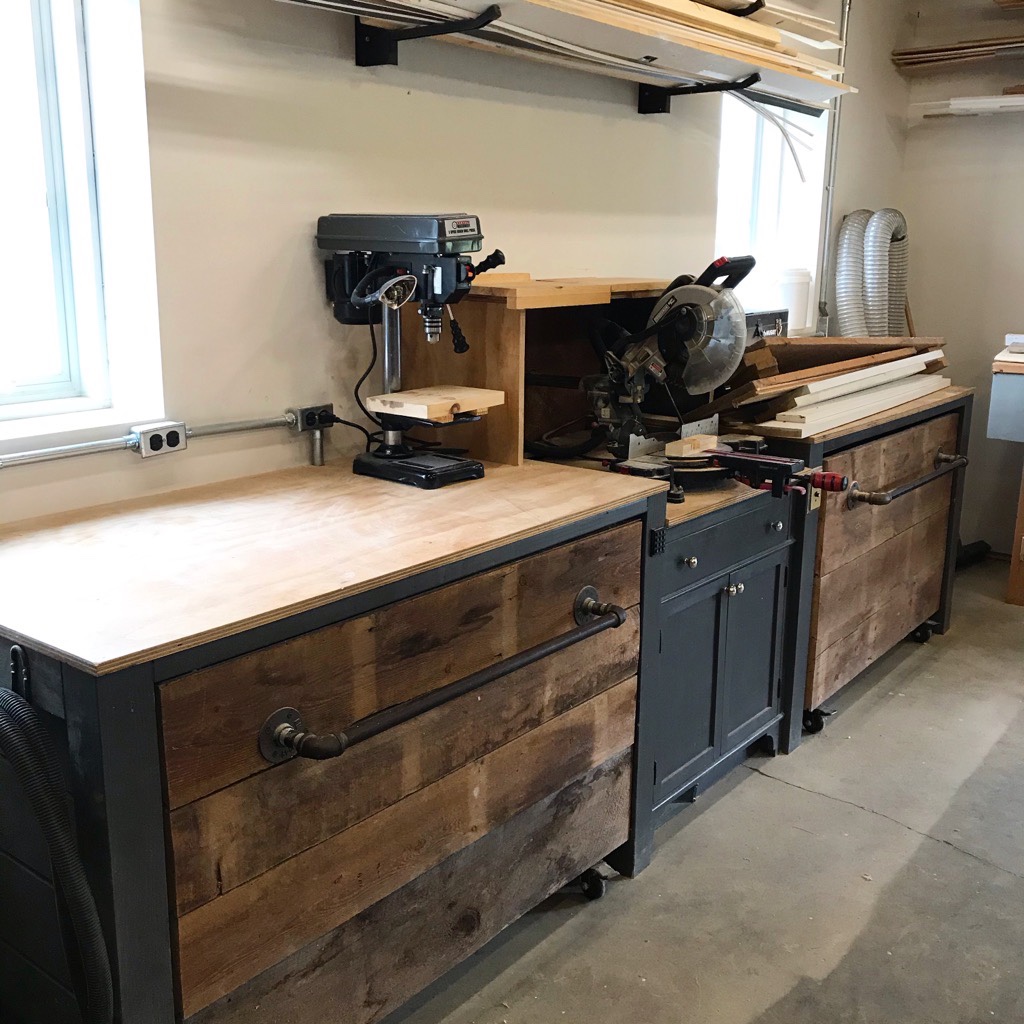

I might add some posts around plans and details of the blast gates (once I get those working again…)